Joining paths
On November 15,2021 by Tom Routley

Joining paths
Suppose you draw a “U” shape and later decide you want to close the shape, essentially joining the ends of the “U” with a straight path. If you select the path, you can use the Join command to create a line segment between the end points, closing the path. When more than one open path is selected, you can join them together to create a closed path. You can also join the end points of two separate paths. Next, you will join the two paths to create a single closed path.
Select the Selection tool (
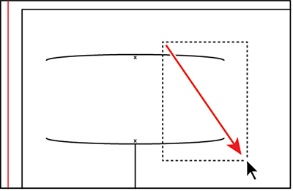
) in the Tools panel. Drag a selection marquee across the two paths. Make sure not to select the line you just drew.
Figure 3-33
Choose Object > Path > Join. Notice that the anchor points on the left side of the paths are now joined with a path.
TIP
If you want to join specific anchor points from separate paths, select the anchor points and press Command+J (Mac OS) or Ctrl+J (Windows).
Choose Object > Path > Join once more.
Choose Select > Deselect to see the closed path.
When you apply the Join command to two or more open paths, Illustrator first looks for and joins the paths that have end points stationed closest to each other. This process is repeated every time you apply the Join command until all paths are joined.
Figure 3-34
TIP
In Lesson 5, “Creating an Illustration with the Drawing Tools,” you’ll learn about the Join tool (), which allows you to join two paths at a corner, keeping the original curve intact.
NOTE
If you only want to fill the shape with a color, it is not necessary to join the path to make a closed path. An open path can have a color fill. It is, however, necessary to join a path if you want a stroke to appear around the entire fill area.
NOTE
On Windows, if your machine supports it, you may see View > Preview On CPU instead of View > Preview.
Choose View > Preview.
Click the joined path to select it and press the letter D to apply the default black 1 pt stroke and white fill. Change the Stroke weight in the Control panel to 2 pt.
>
Figure 3-35
Select the Ellipse tool (
) in the Tools panel and click the artboard. In the Ellipse dialog box, change the Width to 1.1 and the Height to 0.35. Click OK.
Change the Fill color to black and change the Stroke weight to 0 in the Control panel.
Press the letter V to select the Selection tool. Drag the ellipse from the center to the bottom of the vertical path you drew. Snap the center to the bottom of the path.
Don’t worry if the bottom of the lamp is off the bottom of the artboard. Later, you will align all of the lamps to each other.
Figure 3-36 (really fig 3-38)
Open path vs. closed path
That’s how to join two anchors illustrator. As you draw, you create a line called a path. A path is made up of one or more straight or curved segments. The beginning and end of each segment is marked by anchor points, which work like pins holding a wire in place. A path can be closed (for example, a circle), or open, with distinct endpoints (for example, a wavy line).
Figure 3-37
Both open and closed paths can have fills applied to them.
—From Illustrator Help
Article Recommendations
Latest articles
Popular Articles
Archives
- November 2024
- October 2024
- September 2024
- August 2024
- July 2024
- June 2024
- May 2024
- April 2024
- March 2024
- February 2024
- January 2024
- December 2023
- November 2023
- October 2023
- September 2023
- August 2023
- July 2023
- June 2023
- May 2023
- April 2023
- March 2023
- February 2023
- January 2023
- December 2022
- November 2022
- October 2022
- September 2022
- August 2022
- July 2022
- June 2022
- May 2022
- April 2022
- March 2022
- February 2022
- January 2022
- December 2021
- November 2021
- October 2021
- September 2021
- August 2021
- July 2021
- January 2021
Leave a Reply